> ## Documentation Index
> Fetch the complete documentation index at: https://docs.chatzy.ai/llms.txt
> Use this file to discover all available pages before exploring further.
# External apis
### The External APIs Tab
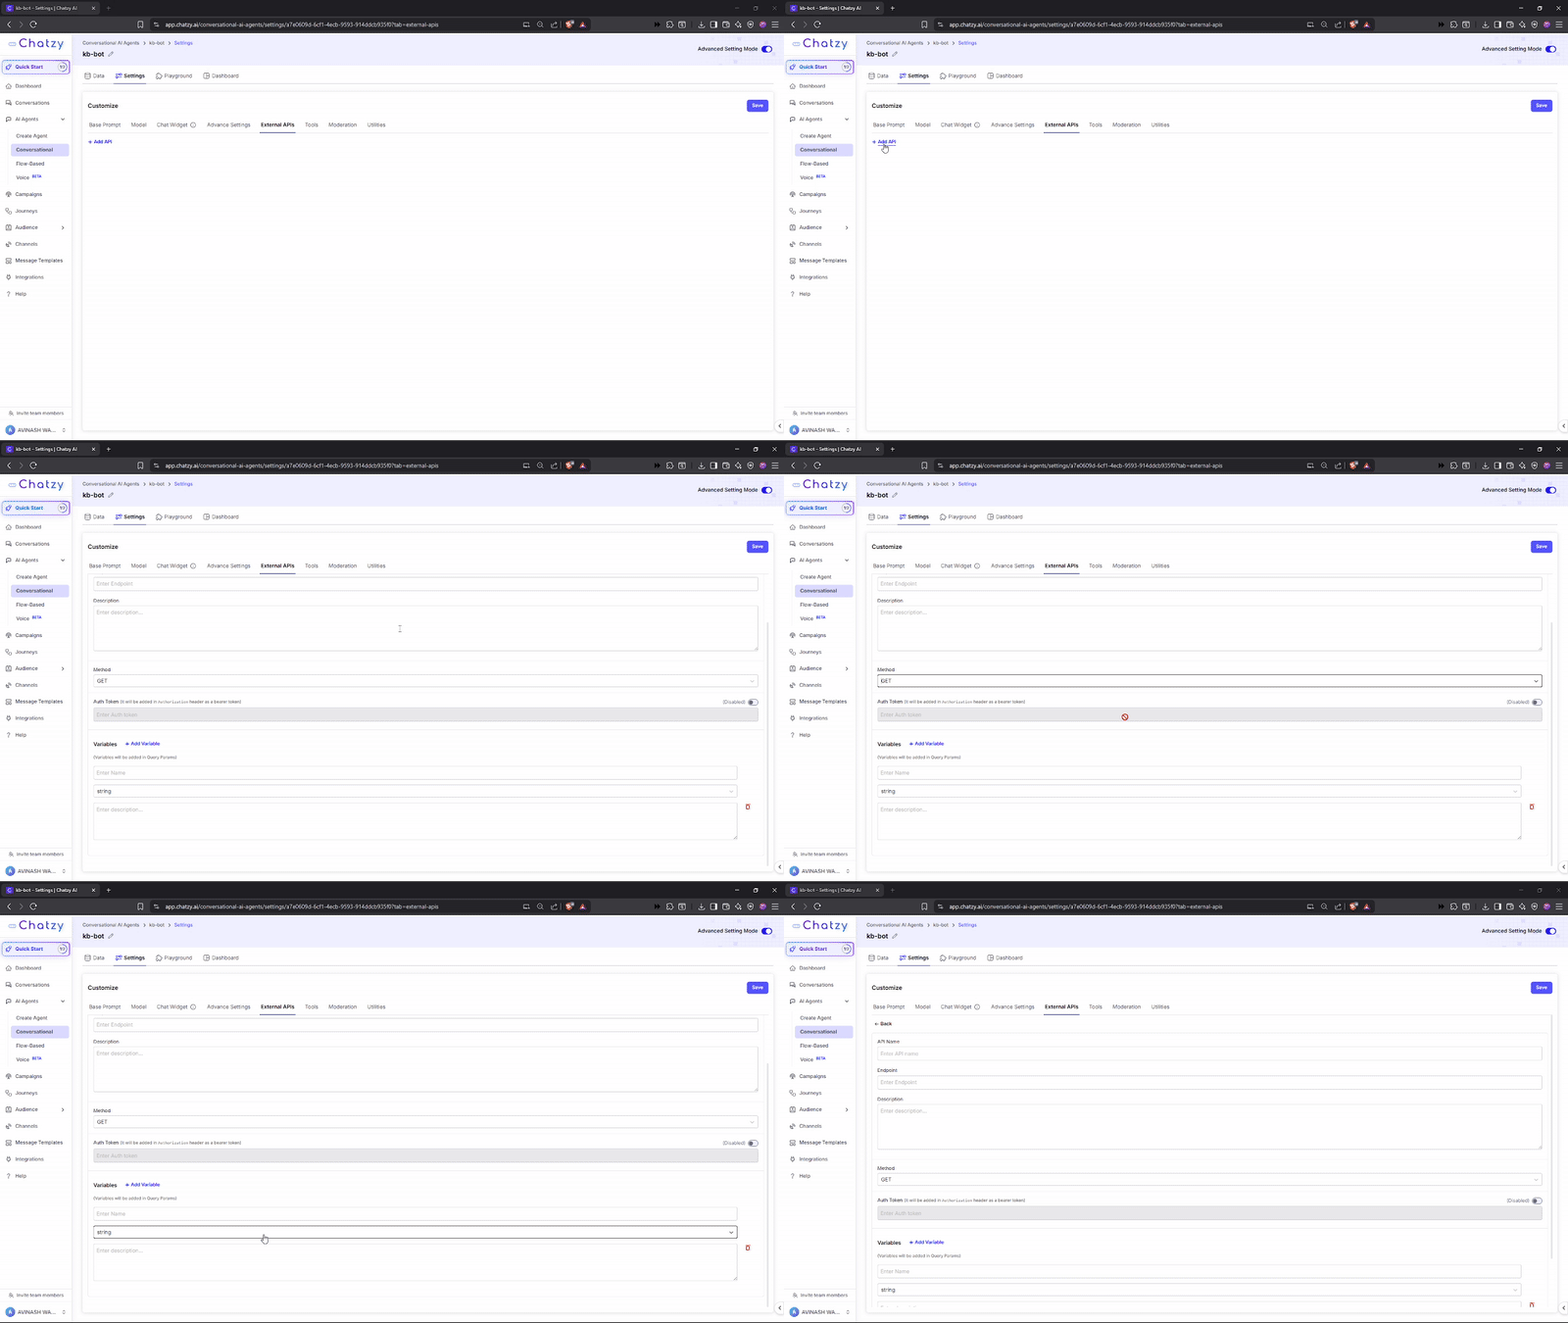
The **External APIs** tab lets you extend your chatbot’s abilities by connecting it to external services. With these integrations, your bot can go beyond its built-in knowledge — fetching real-time data, sending information, or interacting directly with your applications.
 ***
### Key Settings
* **API Name**\
A simple label to identify the API connection.
* **Endpoint**\
The specific URL (web address) where the chatbot sends requests.
* **Description**\
A short explanation of what the API does and when the chatbot should use it.\
*(e.g., Weather API → fetches current weather conditions based on city input).*
* **Method**\
Defines how the chatbot communicates with the API:
* **GET** → Retrieve information. Variables are added as **Query Parameters** at the end of the URL.
* **POST** → Send information. Variables are included in the **request body as JSON**.
* **Auth Token**\
A secure key that verifies your chatbot’s access rights to the API.
* You **do not need to add `Bearer`** manually — ChatzyAI adds it automatically.
* This ensures secure and authorized API requests.
**Example:**\
If your token is `xyz123`, ChatzyAI will send it as:
```http theme={null}
Authorization: Bearer xyz123
```
* **Variables**\
Dynamic inputs for API calls. Their placement depends on the selected `Method`.
* With **GET** → variables are passed as query parameters.
* With **POST** → variables are passed in the request body.
Each variable includes:
* **Name** → Identifier (e.g., `city`).
* **Type** → Data type (e.g., `string`).
* **Description** → Role of the variable.
* **Example** → Sample value showing usage.
**Example:**
**GET Example**
API setup:
* Endpoint → `https://api.example.com/weather`
* Variable → `city = Pune`
***
### Key Settings
* **API Name**\
A simple label to identify the API connection.
* **Endpoint**\
The specific URL (web address) where the chatbot sends requests.
* **Description**\
A short explanation of what the API does and when the chatbot should use it.\
*(e.g., Weather API → fetches current weather conditions based on city input).*
* **Method**\
Defines how the chatbot communicates with the API:
* **GET** → Retrieve information. Variables are added as **Query Parameters** at the end of the URL.
* **POST** → Send information. Variables are included in the **request body as JSON**.
* **Auth Token**\
A secure key that verifies your chatbot’s access rights to the API.
* You **do not need to add `Bearer`** manually — ChatzyAI adds it automatically.
* This ensures secure and authorized API requests.
**Example:**\
If your token is `xyz123`, ChatzyAI will send it as:
```http theme={null}
Authorization: Bearer xyz123
```
* **Variables**\
Dynamic inputs for API calls. Their placement depends on the selected `Method`.
* With **GET** → variables are passed as query parameters.
* With **POST** → variables are passed in the request body.
Each variable includes:
* **Name** → Identifier (e.g., `city`).
* **Type** → Data type (e.g., `string`).
* **Description** → Role of the variable.
* **Example** → Sample value showing usage.
**Example:**
**GET Example**
API setup:
* Endpoint → `https://api.example.com/weather`
* Variable → `city = Pune`
Then the GET call will look like:
```http theme={null}
GET https://api.example.com/weather?city=Pune
```
**Post Example**
API setup:
* Endpoint → `https://api.example.com/lead`
* Variables → `name = John`, `email = john@example.com`
* Auth Token → `xyz123`
The chatbot request will look like:
```http theme={null}
POST https://api.example.com/lead
Authorization: Bearer xyz123
Content-Type: application/json
{
"name": "John",
"email": "john@example.com"
}
```
***
> To call your API, you must include it as an instruction in the prompt with a clear use case.\
> Example: *“Use the `get_weather_by_city` function to fetch weather data.”*
***
| Setting | Purpose |
| --------------- | ------------------------------------------------------------- |
| **API Name** | Label to identify the API |
| **Endpoint** | Web address where the request is sent |
| **Description** | What the API does and when to use it |
| **Method** | GET (retrieve) / POST (send) |
| **Auth Token** | Security key for authentication |
| **Variables** | Dynamic inputs (e.g., `?city=Pune`) for flexible API requests |