> ## Documentation Index
> Fetch the complete documentation index at: https://docs.chatzy.ai/llms.txt
> Use this file to discover all available pages before exploring further.
# Send Email
The **Send Email** action allows your Journey to send emails automatically. You can either:
* Use **Chatzy Email** (default)
* Use **Your Own SMTP Server** (recommended for production)
 ***
## Using Chatzy Email
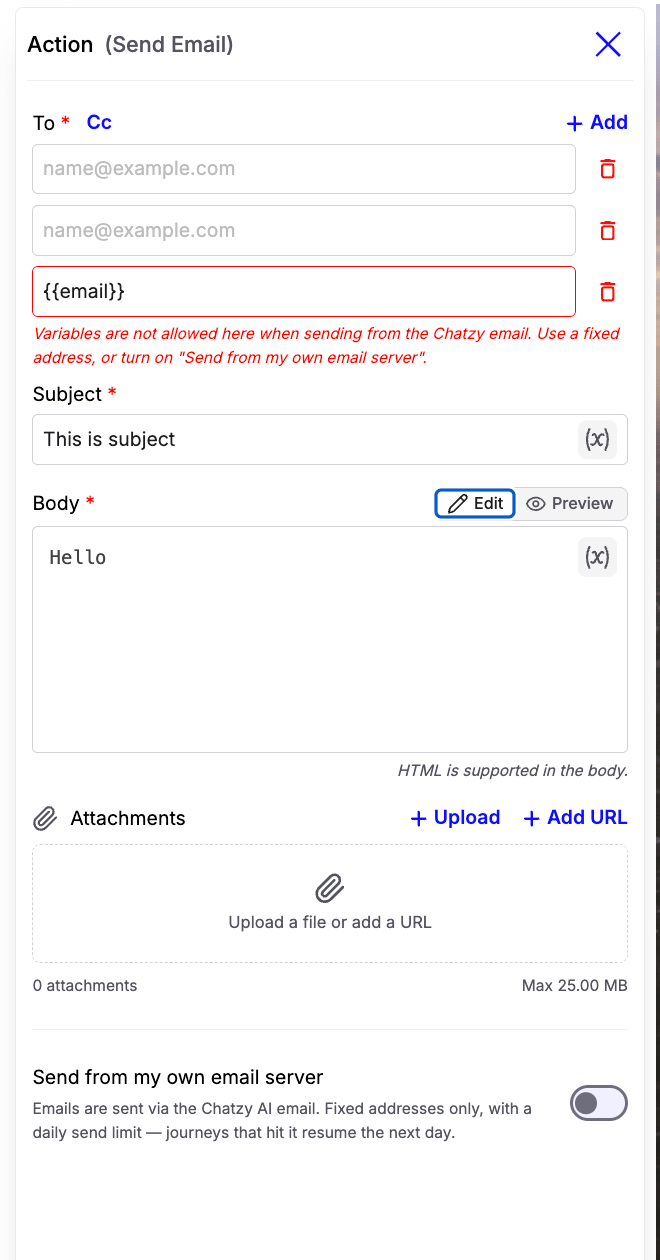
By default, emails are sent through Chatzy's email service.
This is the quickest way to start sending emails without configuring an email server.
> **Recommended:** Use Chatzy Email for sending notifications to your **internal team**, such as lead alerts, support notifications, escalation emails, or daily reports. Since recipient addresses must be fixed, it's best suited for internal communication rather than customer-facing emails.
### Limitations
* Recipient email addresses must be **fixed values**.
* Variables (such as `{{inbound_webhook.email}}`) are **not supported** in the **To** or **Cc** fields.
* A daily sending limit applies.
* Journeys that exceed the limit automatically resume the following day.
> **Note:** If you need to send emails to customers or dynamic email addresses collected during a conversation, enable **Send from my own email server**.
***
## Send from Your Own Email Server
Enable **Send from my own email server** to use your own SMTP provider.
***
## Using Chatzy Email
By default, emails are sent through Chatzy's email service.
This is the quickest way to start sending emails without configuring an email server.
> **Recommended:** Use Chatzy Email for sending notifications to your **internal team**, such as lead alerts, support notifications, escalation emails, or daily reports. Since recipient addresses must be fixed, it's best suited for internal communication rather than customer-facing emails.
### Limitations
* Recipient email addresses must be **fixed values**.
* Variables (such as `{{inbound_webhook.email}}`) are **not supported** in the **To** or **Cc** fields.
* A daily sending limit applies.
* Journeys that exceed the limit automatically resume the following day.
> **Note:** If you need to send emails to customers or dynamic email addresses collected during a conversation, enable **Send from my own email server**.
***
## Send from Your Own Email Server
Enable **Send from my own email server** to use your own SMTP provider.
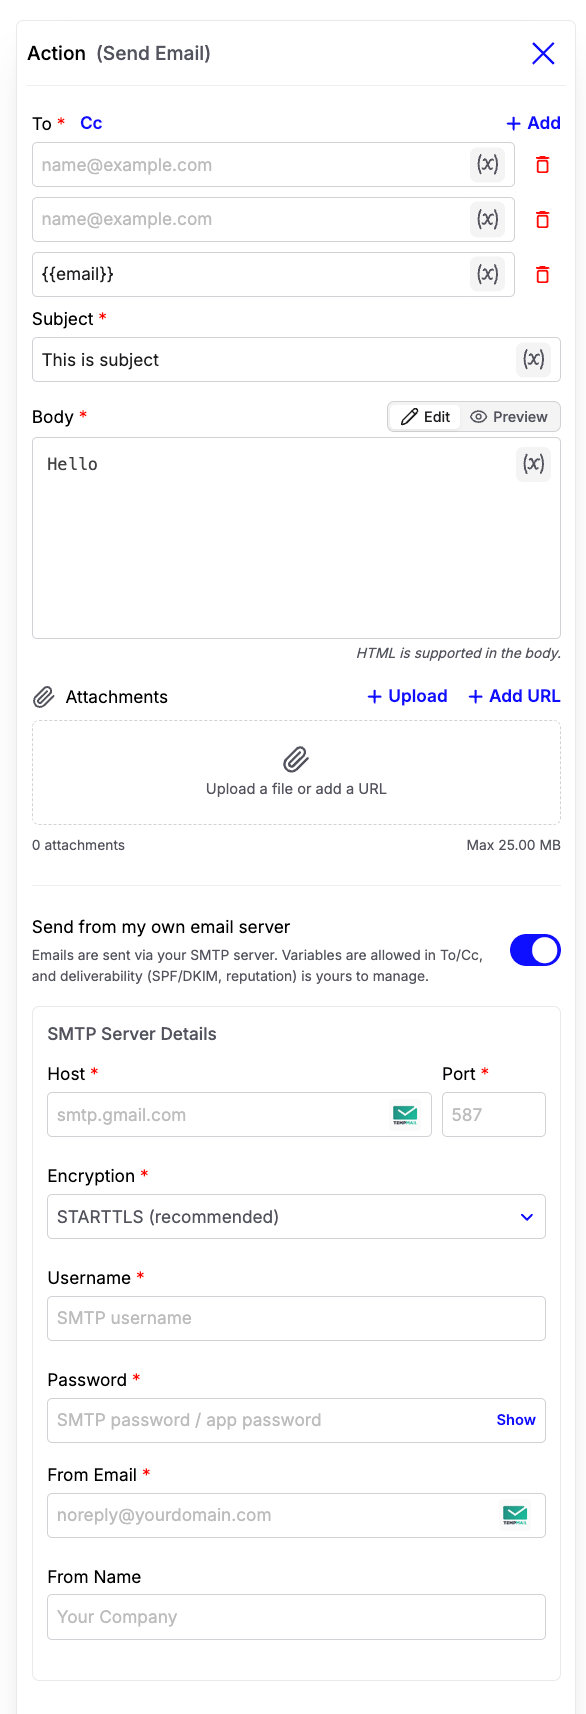 Using your own SMTP server provides several advantages:
* Dynamic email addresses using variables
* Better deliverability
* Your own sender identity
* No Chatzy sending limits
* Full control over SPF, DKIM, and domain reputation
Once enabled, configure the following fields:
| Field | Description |
| ---------- | -------------------------------- |
| Host | SMTP server address |
| Port | SMTP port |
| Encryption | STARTTLS or SSL/TLS |
| Username | SMTP username |
| Password | SMTP password or App Password |
| From Email | Sender email address |
| From Name | Display name shown to recipients |
***
## Gmail SMTP Setup
### Step 1
Enable **2-Step Verification** on your Google account.
[https://myaccount.google.com/security](https://myaccount.google.com/security)
### Step 2
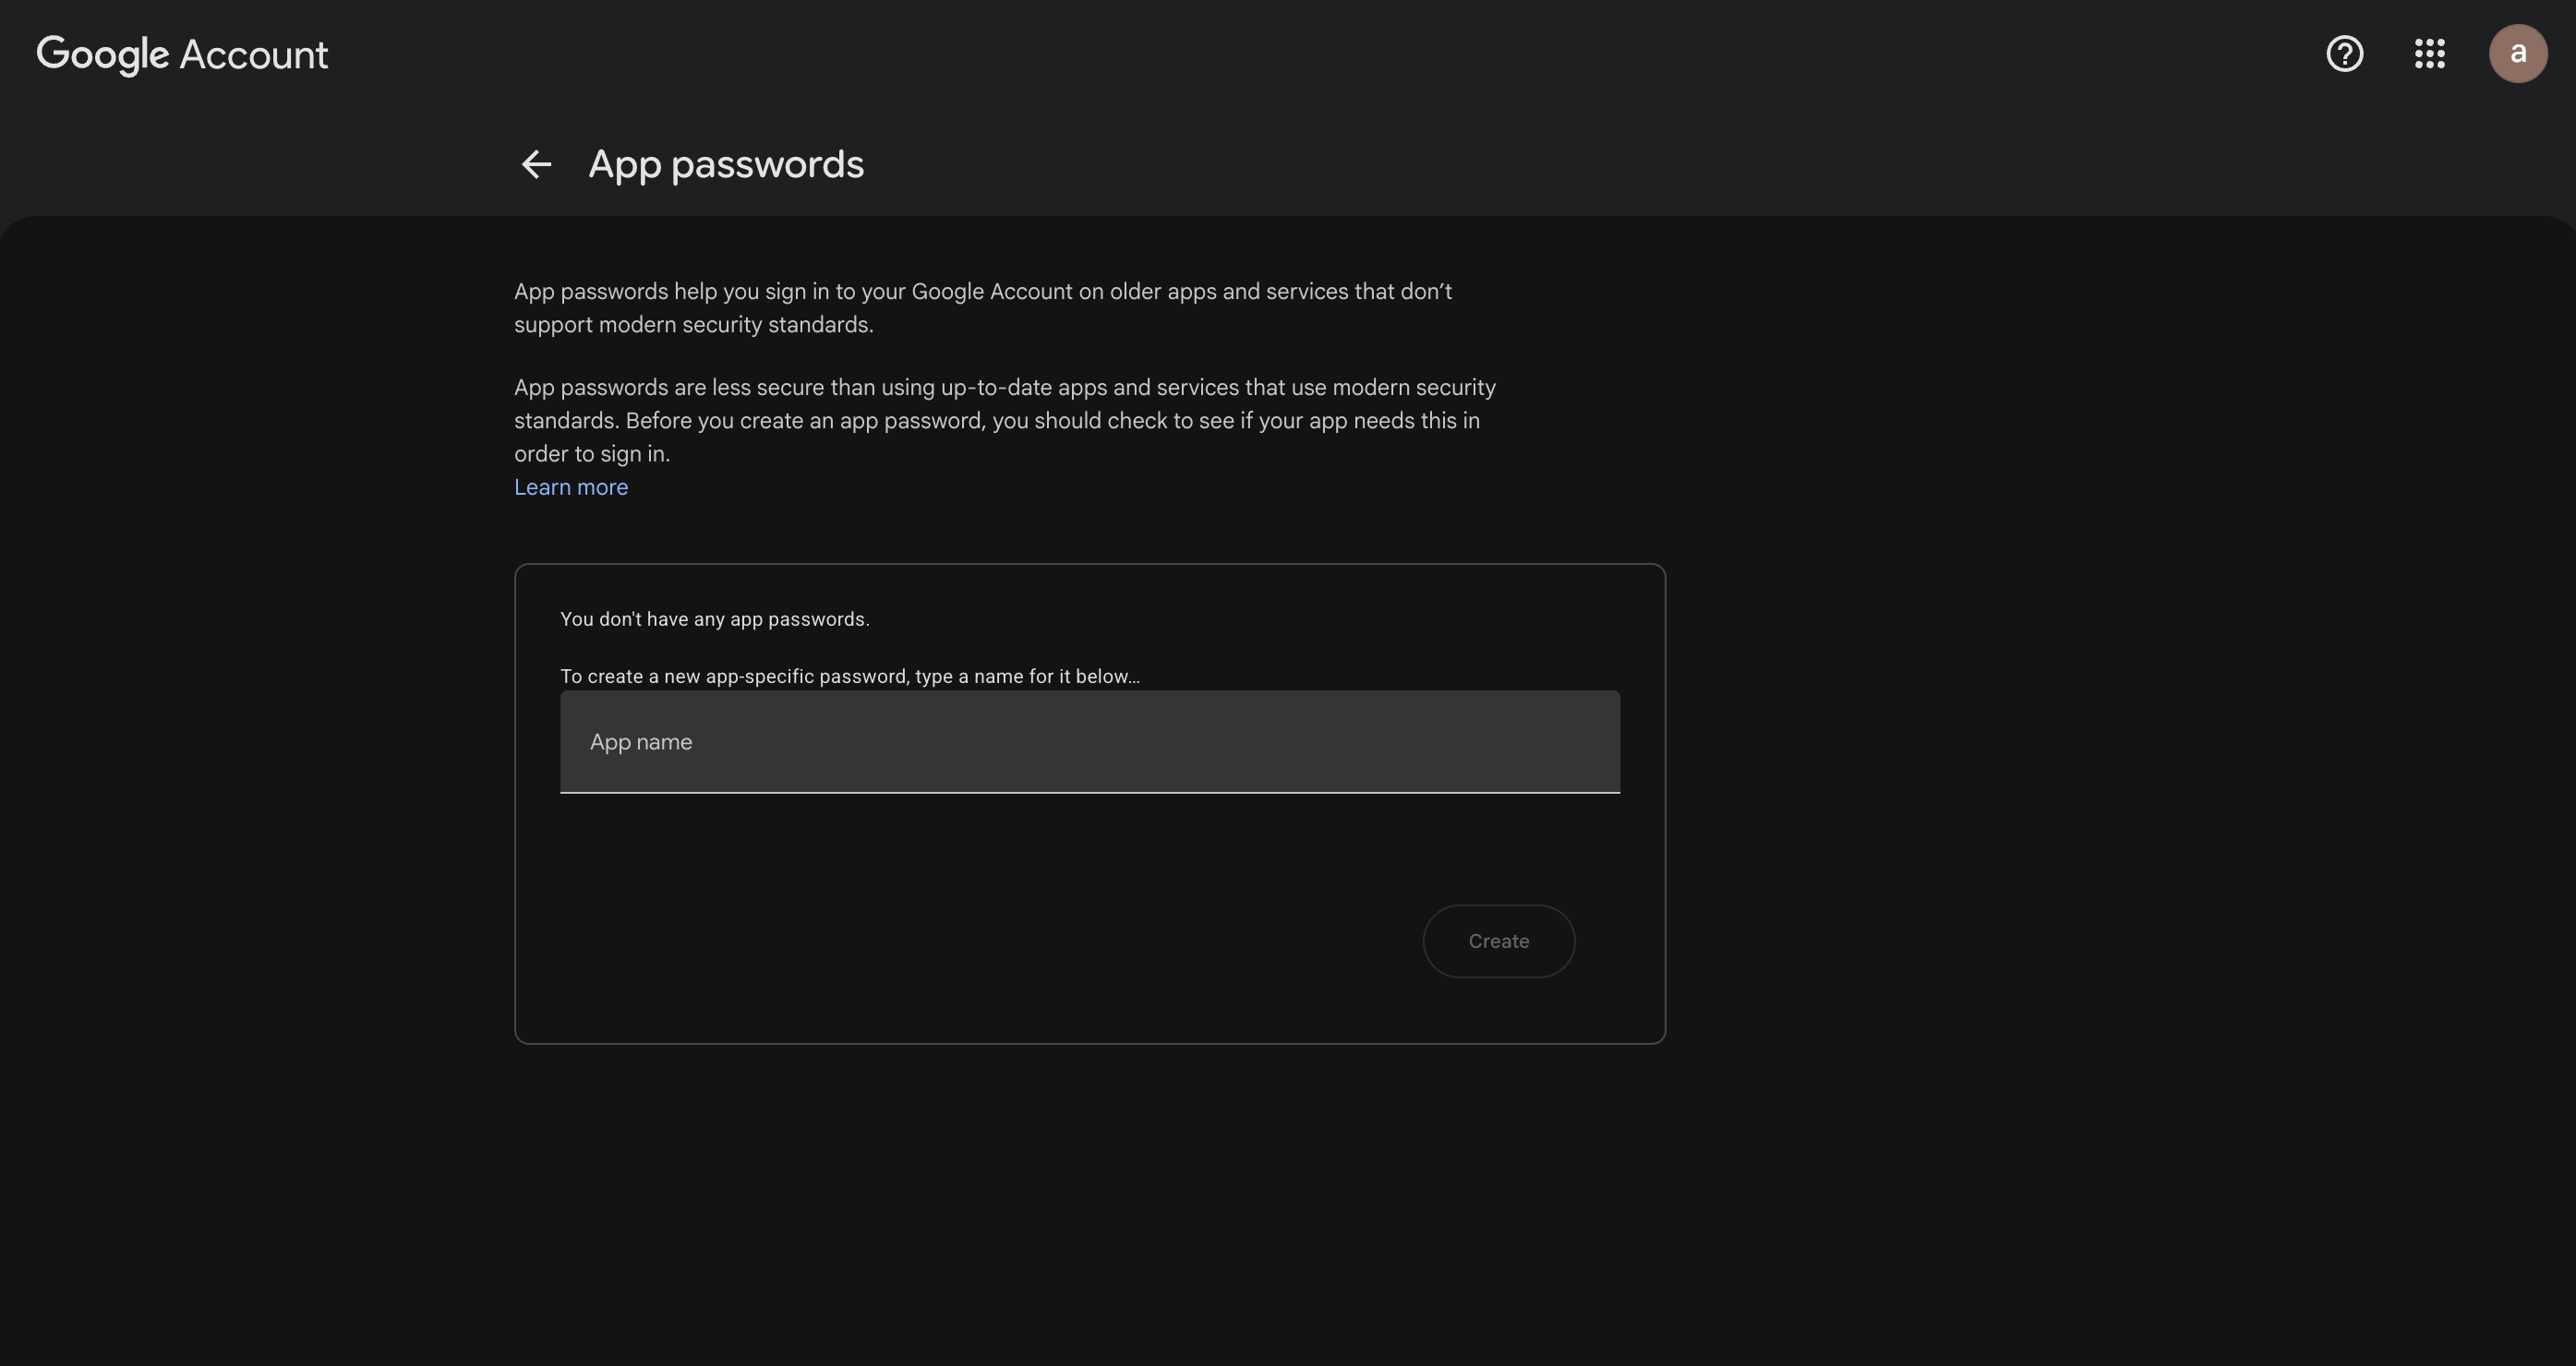
Generate an **App Password** from your Google Account.
Head over to [https://myaccount.google.com/u/1/apppasswords](https://myaccount.google.com/u/1/apppasswords)
Using your own SMTP server provides several advantages:
* Dynamic email addresses using variables
* Better deliverability
* Your own sender identity
* No Chatzy sending limits
* Full control over SPF, DKIM, and domain reputation
Once enabled, configure the following fields:
| Field | Description |
| ---------- | -------------------------------- |
| Host | SMTP server address |
| Port | SMTP port |
| Encryption | STARTTLS or SSL/TLS |
| Username | SMTP username |
| Password | SMTP password or App Password |
| From Email | Sender email address |
| From Name | Display name shown to recipients |
***
## Gmail SMTP Setup
### Step 1
Enable **2-Step Verification** on your Google account.
[https://myaccount.google.com/security](https://myaccount.google.com/security)
### Step 2
Generate an **App Password** from your Google Account.
Head over to [https://myaccount.google.com/u/1/apppasswords](https://myaccount.google.com/u/1/apppasswords)
 ### Step 3
Create an app-specific password
### Step 4
Copy the generated password
### Step 5
Configure the SMTP settings:
| Setting | Value |
| ---------- | -------------------------- |
| Host | `smtp.gmail.com` |
| Port | `587` |
| Encryption | `STARTTLS` |
| Username | Your Gmail address |
| Password | Your Google App Password |
| From Email | Your Gmail address |
| From Name | Your preferred sender name |
### Step 6
Save the configuration and test your Journey by sending an email.
> **Note:** Gmail no longer supports regular account passwords for SMTP. You must use an **App Password** after enabling 2-Step Verification.
***
## Using Variables
When **Send from my own email server** is enabled, variables are supported in:
* To
* Cc
* Subject
* Body
Example:
```
To:
{{inbound_webhook.email}}
Subject:
Your Appointment is Confirmed
Body:
Hello {{name}},
Your appointment has been scheduled for {{appointment_date}} at {{appointment_time}}.
```
***
## Attachments
The Send Email action supports:
* Uploading files directly
* Adding attachments using URLs
Maximum attachment size: **25 MB**.
***
## Rich Email Support
The email body supports HTML formatting.
You can create rich emails with:
* Headings
* Images
* Links
* Tables
* Styled text
Use **Preview** to verify the final email before publishing your Journey.
### Step 3
Create an app-specific password
### Step 4
Copy the generated password
### Step 5
Configure the SMTP settings:
| Setting | Value |
| ---------- | -------------------------- |
| Host | `smtp.gmail.com` |
| Port | `587` |
| Encryption | `STARTTLS` |
| Username | Your Gmail address |
| Password | Your Google App Password |
| From Email | Your Gmail address |
| From Name | Your preferred sender name |
### Step 6
Save the configuration and test your Journey by sending an email.
> **Note:** Gmail no longer supports regular account passwords for SMTP. You must use an **App Password** after enabling 2-Step Verification.
***
## Using Variables
When **Send from my own email server** is enabled, variables are supported in:
* To
* Cc
* Subject
* Body
Example:
```
To:
{{inbound_webhook.email}}
Subject:
Your Appointment is Confirmed
Body:
Hello {{name}},
Your appointment has been scheduled for {{appointment_date}} at {{appointment_time}}.
```
***
## Attachments
The Send Email action supports:
* Uploading files directly
* Adding attachments using URLs
Maximum attachment size: **25 MB**.
***
## Rich Email Support
The email body supports HTML formatting.
You can create rich emails with:
* Headings
* Images
* Links
* Tables
* Styled text
Use **Preview** to verify the final email before publishing your Journey.