> ## Documentation Index
> Fetch the complete documentation index at: https://docs.chatzy.ai/llms.txt
> Use this file to discover all available pages before exploring further.
# Triggers
## Adding a Trigger
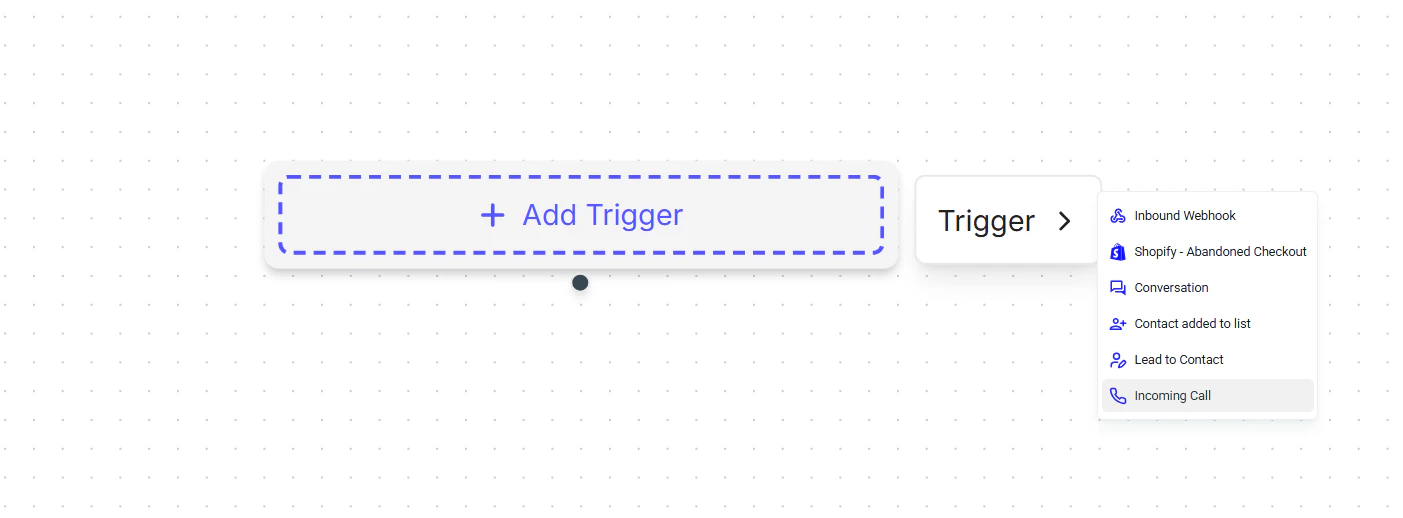
The first step in creating a journey is selecting a **trigger**, which is the event that starts the journey.\
You can choose from several trigger options depending on your use case.
 ***
## Trigger Types
### Inbound Webhook
The **Inbound Webhook** trigger allows your journey to start when data is sent from an external system, such as CRMs, forms, or even another AI agent within Chatzy AI.
***
## Trigger Types
### Inbound Webhook
The **Inbound Webhook** trigger allows your journey to start when data is sent from an external system, such as CRMs, forms, or even another AI agent within Chatzy AI.
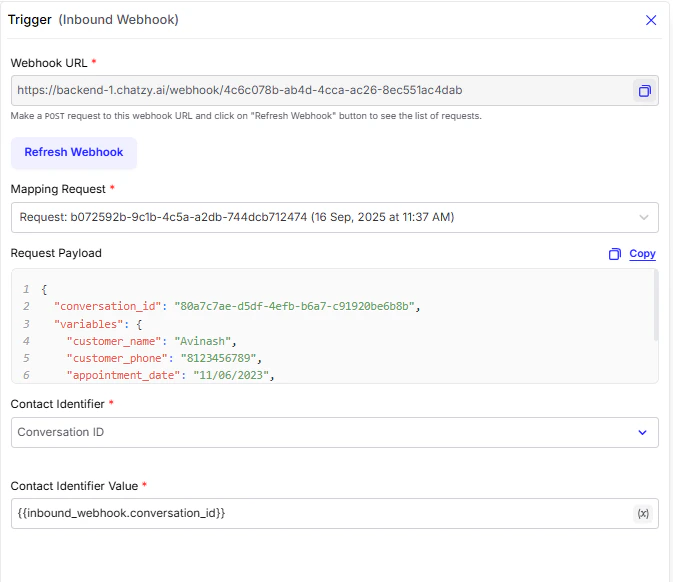
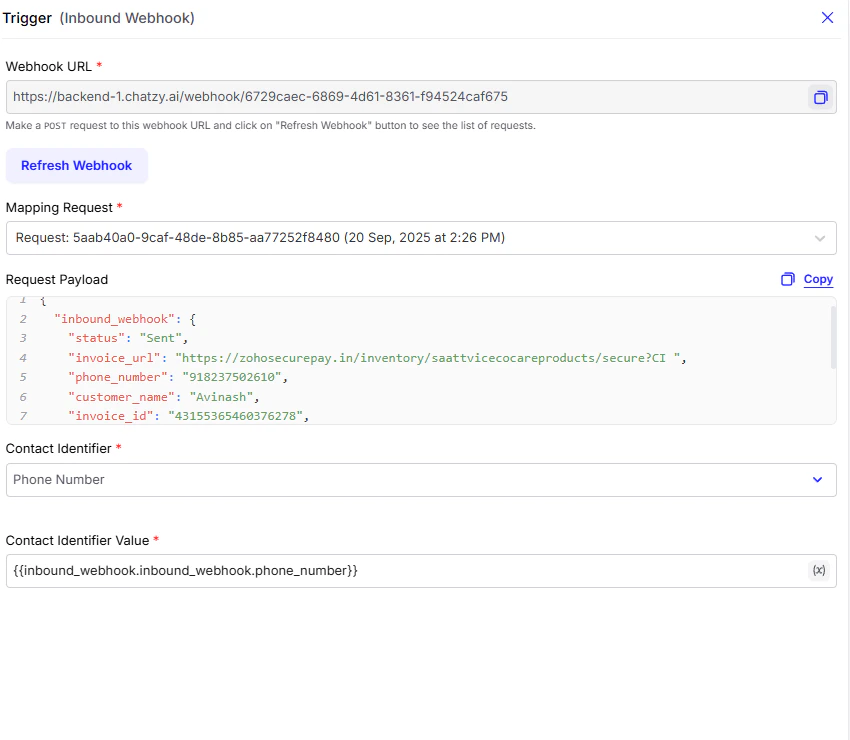 #### Setup Steps
1. Create a unique webhook URL in the platform.
2. Configure your external app to send a `POST` request to this URL.
* Example: Appointment booking details sent to the webhook.
3. Refresh the webhook to view incoming data and map fields (for example, `name`, `phone_number`, `appointment_date`).
4. Select a contact identifier (for example, phone number or conversation ID).
#### Using Variables from Your Journey Trigger
When your journey is triggered by an external source like a webhook, the incoming data is stored in a payload. To access specific variables from this payload, use **dot notation**.
**Example 1:**\
If your webhook receives data with a `phone_number`, reference it like this:
```handlebars theme={null}
{{inbound_webhook.phone_number}}
```
**Example 2:**\
Suppose your inbound webhook payload includes a customer object with a name and email.
```json theme={null}
{
"customer": {
"name": "Jane Doe",
"email": "jane.doe@example.com"
}
}
```
To use the customer's name in your flow, reference it like this:
```handlebars theme={null}
{{inbound_webhook.customer.name}}
```
***
### Conversation-Based Trigger
Trigger conditions allow you to fine-tune **when** a journey should run.\
By enabling these filters, you can ensure your chatbot only responds to specific scenarios such as template replies, keywords, or exclusions.
***
#### Conversation Created in Response to a Template Message
Available only on **WhatsApp**, this condition triggers a journey only when a customer replies to a specific template message you sent earlier.
**Example:**\
You are running a nurture sequence with two templates: **Day 1** and **Day 3**.
* **Journey A** handles replies to *Day 1* and assigns conversations to **AI Agent A**.
* **Journey B** handles replies to *Day 3* and assigns conversations to **AI Agent B**.
You can also set a **time window**. If a reply comes after the window (for example, 24 hours), the journey will not trigger.
***
#### Conversation Created Excluding Response to a Template Message
This condition triggers a journey when a new conversation is created **unless** the conversation was started as a reply to a template message.\
Use this when you want to handle only organic or non-template-driven conversations.
**Use Case:**
* You send campaign templates that are handled by dedicated journeys.
* You also want a separate journey to handle organic incoming messages (for example, website visitors, direct DMs, or directory lookups).
* Configure one journey with **Conversation Created in Response to a Template Message** for template replies, and another with **Conversation Created Excluding Response to a Template Message** to capture all other new conversations.
**Example:**
* A user replies to a Day 1 template → handled by the template-specific journey.
* A user finds your number on the website and messages "Hi" → handled by the journey that **excludes** template replies.
***
#### Conversation Created with Keyword
This condition triggers a journey based on keywords or phrases in the customer's message.
**Example:**\
You send a message with two quick reply buttons: **Book Appointment** and **Tell Me More**.
* If the user replies with *“Book Appointment”*, the journey assigns them to an **Appointment Booking AI Agent**.
* If the user replies with *“Tell Me More”*, the journey assigns them to a **Product Info AI Agent**.
***
#### Excluding Conditions
Exclusion filters help you build more advanced routing by preventing certain messages from triggering a journey.
**Example:**\
You have 2 different journeys:
* **Journey A** → triggers **only** if the message contains the keyword *“Pricing”*.
* **Journey B** → triggers for all messages **except** those containing *“Pricing”*.
This ensures that all “Pricing” queries go to Journey A, while everything else is handled by Journey B.
***
#### Default Path
If no conditions are enabled, the journey becomes the **default path** and triggers on *any new conversation*.
**Example:**\
A customer messages *“Hi”* on WhatsApp.\
With no conditions set, your default journey will still run and handle the greeting.
***
### Contact Added to List
This trigger starts a journey whenever a new contact is added to a list (such as onboarding or welcome flows).
#### Setup Steps
1. Create a unique webhook URL in the platform.
2. Configure your external app to send a `POST` request to this URL.
* Example: Appointment booking details sent to the webhook.
3. Refresh the webhook to view incoming data and map fields (for example, `name`, `phone_number`, `appointment_date`).
4. Select a contact identifier (for example, phone number or conversation ID).
#### Using Variables from Your Journey Trigger
When your journey is triggered by an external source like a webhook, the incoming data is stored in a payload. To access specific variables from this payload, use **dot notation**.
**Example 1:**\
If your webhook receives data with a `phone_number`, reference it like this:
```handlebars theme={null}
{{inbound_webhook.phone_number}}
```
**Example 2:**\
Suppose your inbound webhook payload includes a customer object with a name and email.
```json theme={null}
{
"customer": {
"name": "Jane Doe",
"email": "jane.doe@example.com"
}
}
```
To use the customer's name in your flow, reference it like this:
```handlebars theme={null}
{{inbound_webhook.customer.name}}
```
***
### Conversation-Based Trigger
Trigger conditions allow you to fine-tune **when** a journey should run.\
By enabling these filters, you can ensure your chatbot only responds to specific scenarios such as template replies, keywords, or exclusions.
***
#### Conversation Created in Response to a Template Message
Available only on **WhatsApp**, this condition triggers a journey only when a customer replies to a specific template message you sent earlier.
**Example:**\
You are running a nurture sequence with two templates: **Day 1** and **Day 3**.
* **Journey A** handles replies to *Day 1* and assigns conversations to **AI Agent A**.
* **Journey B** handles replies to *Day 3* and assigns conversations to **AI Agent B**.
You can also set a **time window**. If a reply comes after the window (for example, 24 hours), the journey will not trigger.
***
#### Conversation Created Excluding Response to a Template Message
This condition triggers a journey when a new conversation is created **unless** the conversation was started as a reply to a template message.\
Use this when you want to handle only organic or non-template-driven conversations.
**Use Case:**
* You send campaign templates that are handled by dedicated journeys.
* You also want a separate journey to handle organic incoming messages (for example, website visitors, direct DMs, or directory lookups).
* Configure one journey with **Conversation Created in Response to a Template Message** for template replies, and another with **Conversation Created Excluding Response to a Template Message** to capture all other new conversations.
**Example:**
* A user replies to a Day 1 template → handled by the template-specific journey.
* A user finds your number on the website and messages "Hi" → handled by the journey that **excludes** template replies.
***
#### Conversation Created with Keyword
This condition triggers a journey based on keywords or phrases in the customer's message.
**Example:**\
You send a message with two quick reply buttons: **Book Appointment** and **Tell Me More**.
* If the user replies with *“Book Appointment”*, the journey assigns them to an **Appointment Booking AI Agent**.
* If the user replies with *“Tell Me More”*, the journey assigns them to a **Product Info AI Agent**.
***
#### Excluding Conditions
Exclusion filters help you build more advanced routing by preventing certain messages from triggering a journey.
**Example:**\
You have 2 different journeys:
* **Journey A** → triggers **only** if the message contains the keyword *“Pricing”*.
* **Journey B** → triggers for all messages **except** those containing *“Pricing”*.
This ensures that all “Pricing” queries go to Journey A, while everything else is handled by Journey B.
***
#### Default Path
If no conditions are enabled, the journey becomes the **default path** and triggers on *any new conversation*.
**Example:**\
A customer messages *“Hi”* on WhatsApp.\
With no conditions set, your default journey will still run and handle the greeting.
***
### Contact Added to List
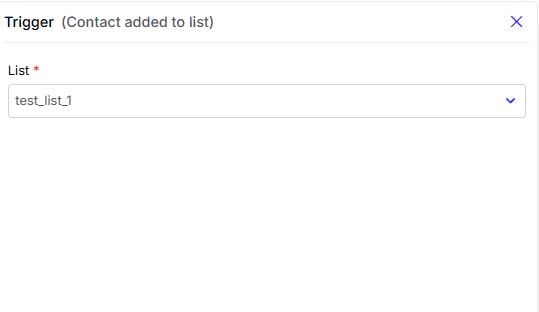
This trigger starts a journey whenever a new contact is added to a list (such as onboarding or welcome flows).
 #### Setup Steps
1. Select the target list (for example, New Leads, Newsletter Subscribers, or Trial Users).
2. Define the journey actions, such as sending a welcome message, onboarding flow, or automated follow-up.
**Example:**\
When a lead is added to the **New Leads** list, the journey begins with a welcome message and next-step guidance.
***
### Lead to Contact
The **Lead to Contact** trigger automates the transition of prospects into valuable contacts directly through an interaction with your AI Agent.
This trigger fires when a user who starts as a qualified **Lead** interacts with the AI agent and meets a specific set of criteria defined within the chat flow.\
Once the **qualification condition** is met (for example, they provide an Email or Phone number), the system automatically converts that record into a fully qualified **Chatzy Contact**.
This process helps streamline your sales funnel by:
1. **Qualifying in Real Time:** The AI agent handles the entire qualification process.
2. **Automating Conversion:** The lead is instantly promoted to a contact status, ready for follow-up campaigns.
#### Configuration Field
#### Setup Steps
1. Select the target list (for example, New Leads, Newsletter Subscribers, or Trial Users).
2. Define the journey actions, such as sending a welcome message, onboarding flow, or automated follow-up.
**Example:**\
When a lead is added to the **New Leads** list, the journey begins with a welcome message and next-step guidance.
***
### Lead to Contact
The **Lead to Contact** trigger automates the transition of prospects into valuable contacts directly through an interaction with your AI Agent.
This trigger fires when a user who starts as a qualified **Lead** interacts with the AI agent and meets a specific set of criteria defined within the chat flow.\
Once the **qualification condition** is met (for example, they provide an Email or Phone number), the system automatically converts that record into a fully qualified **Chatzy Contact**.
This process helps streamline your sales funnel by:
1. **Qualifying in Real Time:** The AI agent handles the entire qualification process.
2. **Automating Conversion:** The lead is instantly promoted to a contact status, ready for follow-up campaigns.
#### Configuration Field
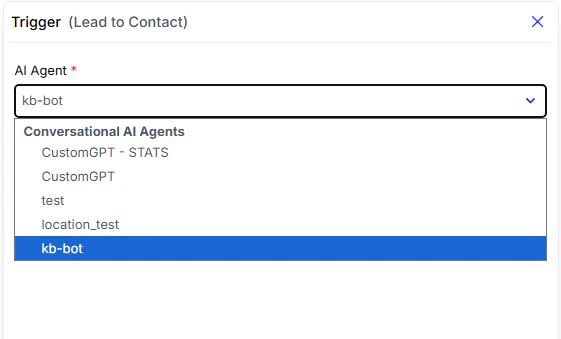 * **AI Agent:** This dropdown allows you to select the specific AI Agent that will be used by this trigger.\
You can choose between:
* **Conversational AI Agents** (Free will bots).
* **Flow-Based AI Agents** (Rule-based bots).
Setting up an automated lead management system is a multi-step process that spans the **Base Prompt**, **Notifications**, and **Utilities** tabs.\
It ensures that contacts are captured, qualified, and team members are instantly notified.
***
#### Step 1: Enable Data Collection (Base Prompt)
Enable the chatbot to collect the necessary contact details.
* **Action:** Go to **Base Prompt** and turn the **Collect Details** toggle **On**.
* **Purpose:** This allows the chatbot to automatically capture key lead information such as **Name, Phone, or Email** during the conversation.\
These collected details will appear in the Leads section of your dashboard.
***
#### Step 2: Configure Lead Notifications and Qualification
Set the rules for when a lead is considered qualified and who should be notified.
* **Action:** Go to the **Dashboard - Notifications** settings.
* **Receive New Leads on Email:** Enable this toggle to receive instant alerts for qualified leads.
> Note: Leads are emailed to all team members except those with the Agent role.
* **Lead Qualification:** Enter the condition that must be met for a lead to be considered qualified (for example, `email_id` is present).
* **Frequency:** Set how often notifications should be processed and sent.
* **Extract Entities:** Enable this to allow automatic extraction of important data points from the conversation.
***
#### Step 3: Enable Lead-to-Contact Conversion (Utilities)
Enable the automatic conversion of qualified leads into permanent contacts.
* **Action:** Go to the **Utilities** tab and enable the **Convert Leads to Contacts** toggle.
* **Purpose:** This links qualified leads from the chatbot directly to your platform’s permanent Contacts list.
### Incoming Call Trigger (WhatsApp Exclusive)
The **Incoming Call Trigger** is a specialized trigger exclusive to the **WhatsApp** channel. It is used to assign a dedicated **Voice AI Agent** to automatically answer any incoming WhatsApp voice call.
* **AI Agent:** This dropdown allows you to select the specific AI Agent that will be used by this trigger.\
You can choose between:
* **Conversational AI Agents** (Free will bots).
* **Flow-Based AI Agents** (Rule-based bots).
Setting up an automated lead management system is a multi-step process that spans the **Base Prompt**, **Notifications**, and **Utilities** tabs.\
It ensures that contacts are captured, qualified, and team members are instantly notified.
***
#### Step 1: Enable Data Collection (Base Prompt)
Enable the chatbot to collect the necessary contact details.
* **Action:** Go to **Base Prompt** and turn the **Collect Details** toggle **On**.
* **Purpose:** This allows the chatbot to automatically capture key lead information such as **Name, Phone, or Email** during the conversation.\
These collected details will appear in the Leads section of your dashboard.
***
#### Step 2: Configure Lead Notifications and Qualification
Set the rules for when a lead is considered qualified and who should be notified.
* **Action:** Go to the **Dashboard - Notifications** settings.
* **Receive New Leads on Email:** Enable this toggle to receive instant alerts for qualified leads.
> Note: Leads are emailed to all team members except those with the Agent role.
* **Lead Qualification:** Enter the condition that must be met for a lead to be considered qualified (for example, `email_id` is present).
* **Frequency:** Set how often notifications should be processed and sent.
* **Extract Entities:** Enable this to allow automatic extraction of important data points from the conversation.
***
#### Step 3: Enable Lead-to-Contact Conversion (Utilities)
Enable the automatic conversion of qualified leads into permanent contacts.
* **Action:** Go to the **Utilities** tab and enable the **Convert Leads to Contacts** toggle.
* **Purpose:** This links qualified leads from the chatbot directly to your platform’s permanent Contacts list.
### Incoming Call Trigger (WhatsApp Exclusive)
The **Incoming Call Trigger** is a specialized trigger exclusive to the **WhatsApp** channel. It is used to assign a dedicated **Voice AI Agent** to automatically answer any incoming WhatsApp voice call.
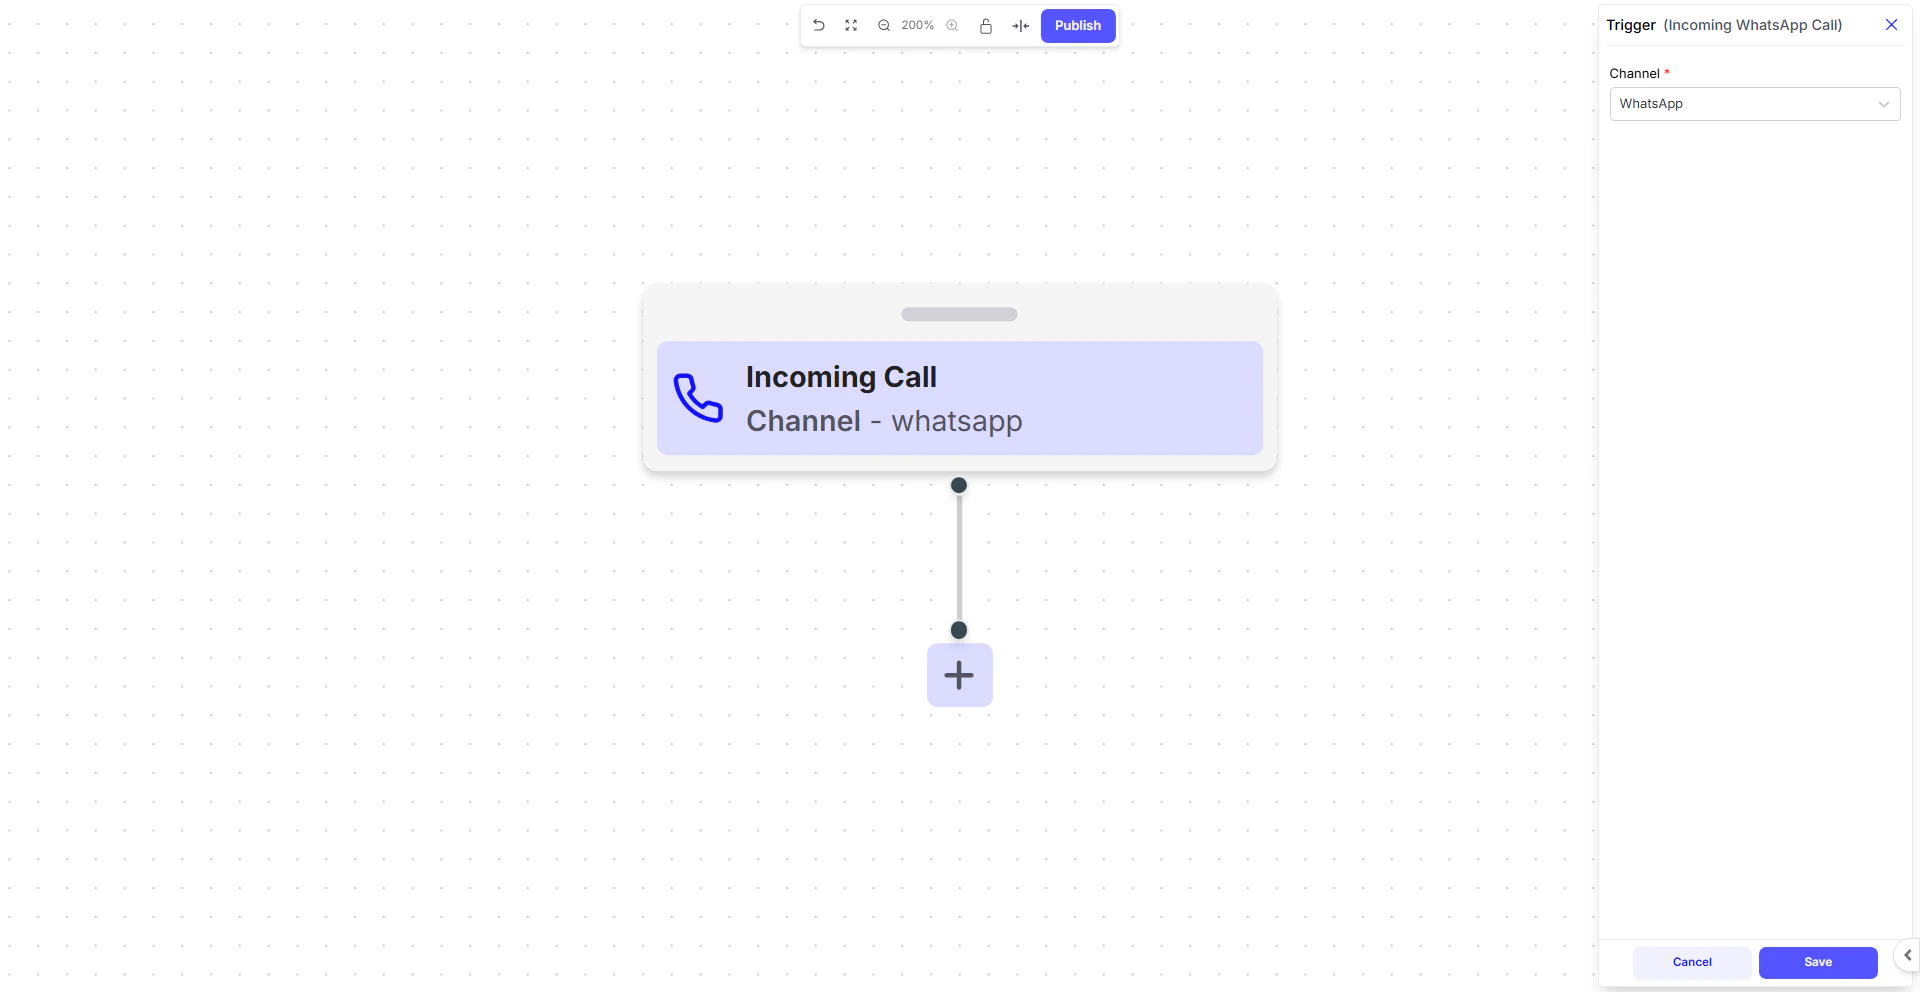 This trigger allows your business to:
* **Answer Instantly**: Ensure every incoming WhatsApp call is handled immediately, 24/7.
* **Automate Voice Tasks**: Use your Voice AI Agent to manage common call functions like appointment booking, qualification, or providing information through natural conversation.
This trigger allows your business to:
* **Answer Instantly**: Ensure every incoming WhatsApp call is handled immediately, 24/7.
* **Automate Voice Tasks**: Use your Voice AI Agent to manage common call functions like appointment booking, qualification, or providing information through natural conversation.